
How to make an acrylic wall calendar
Learn how to make your own acrylic wall calendar with this affordable DIY tutorial using a Cricut, hardware store plexiglass & sign hardware from Amazon.
— Read about the most recent update I made here.–

This post contains affiliate links. As an Amazon Associate I earn from qualifying purchases. See my full disclosure here.
SEE MY VIDEO TUTORIAL HERE || SHOP SUPPLIES HERE
• • • • • • • • • • • • • • • • • • • • • • • • • • • • • • • •
I wanted an oversized, acrylic plexiglass wall calendar for planning but I did not want to spend 300 plus dollars on one so I chose to make my own.
The Plan
Below is the wall in my hallway where I decided a large, acrylic wall calendar would work best since it is in a central location. In my opinion, “Out of sight, out of mind” reigns true when it comes to a planning calendar. I drew a quick iPhone sketch of my plan to help me determine a size I liked. I am a very visual person so I often use the photo edit function in my iPhone to help my designs & plans come to life.
Based on the sketch, the available wall space and the pre-cut size options of plexiglass at my hardware store, I decided a 30 inch by 36 inch piece would fit best. I purchased my pre-cut piece of acrylic plexiglass at my local Home Depot. If you don’t have a ‘big box’ hardware store where you live, check out your local glass shop or small hardware store. They should be able to cut a custom piece piece for you.


Acrylic Calendar Supplies
- 30″ x 36″ plexiglass
- sign stand off wall mounts
- painter’s tape
- pencil or sharpie
- drill (this set is my fav)
- step bit (found at Harbor Freight)
- dish soap
- speed square or measuring tape
- clamp
- scrap wood (strong enough to drill on)
- level
- Cricut Machine
- 12″ x 24″ cutting mat
- Oracle Black Vinyl
- Transfer Tape
- Water-soluble Marker Set or Expo wet-erase markers
Step by Step Acrylic Calendar
- Determine calendar size & mounting hole locations
- Place painter’s tape on corners & mark hole locations
- Clamp plexiglass to stabilize.
- Lubricate step bit with dish soap
- Drill holes slowly to prevent cracking
- Use pre-drilled plexiglass to mark hardware location on wall
- Install stand-off hardware & test hang calendar
- Create vinyl design or purchase my design here
- Cut vinyl design using Cricut (or other cutting machine)
- Weed vinyl
- Remove protective plastic from one side of plexiglass
- Mark vinyl placement with painter’s tape
- Apply vinyl design using transfer tape
- Remove protective plastic & hang completed calendar
The Process Explained
Mark Hole Locations
The first step was to mark and drill holes for the sign stand offs. After putting two layers of painter’s tape on each corner, I made marks 1 3/8 inches in from the corners. This is where my sign stand offs go. Based on the sign stand off screw size, the holes needed to be about 3/8″. Once the corners were marked, I clamped the plexiglass to a table with several scrap boards between it and the table. This gave the plexiglass a stable base to drill on. I made sure to clamp the plexiglass and the boards slightly offset so if the step bit went through the scrap boards, it would not damage my table. Plexiglass will scratch easily, so I kept the protective plastic on the plexiglass throughout the whole process.
Drilling Holes in Plexiglass
Drilling holes in plexiglass can be tricky. My husband recommended I use a step bit like the one below. The idea is that by beginning with a smaller hole then gradually ‘stepping up’ to a larger one, it will reduce stress on the material, therefore decreasing the chance of cracking or splitting. I lubricated the step bit with a drop or two of dish soap for each hole. I tried to let the weight of the drill do the work without pushing too hard to prevent cracking as well.


Install Sign Stand-offs
Once the holes were drilled, I held up the plexiglass on the wall, checked for level and marked the holes. This is where the sign stand-offs will be installed.
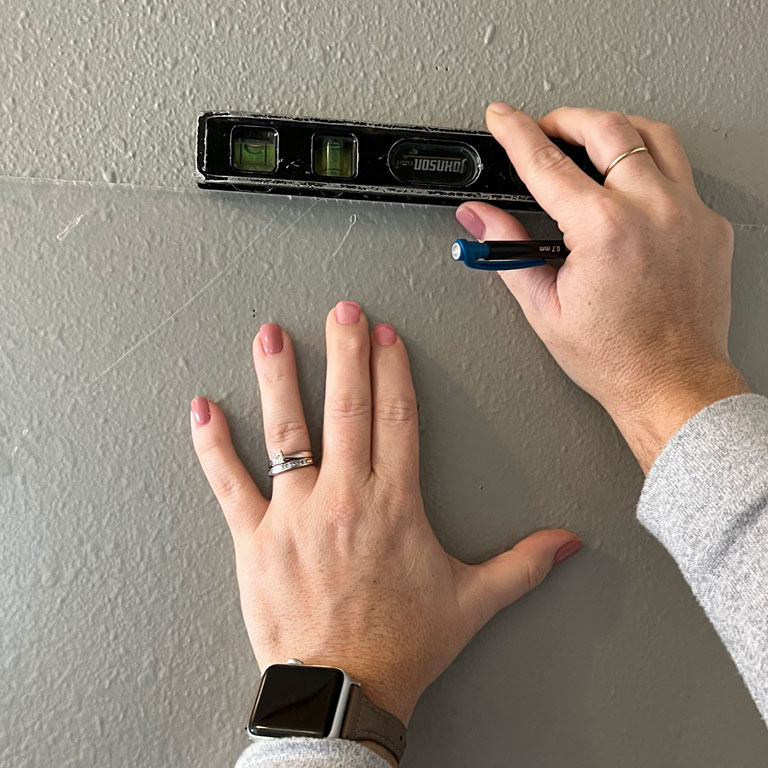

I pre-drilled the marks I made and then screwed in the sign stand offs. Pre-drilling is VERY important! It ensures that the screw will go in straight. If the screw goes in crooked, the stand-off hardware may not line up correctly, which can put undue stress on the plexiglass and cause cracking. A test hang to made sure everything lined up correctly. Since my plexiglass was ready to hang on the wall, it was time to create my calendar graphic.


Design Calendar Graphic
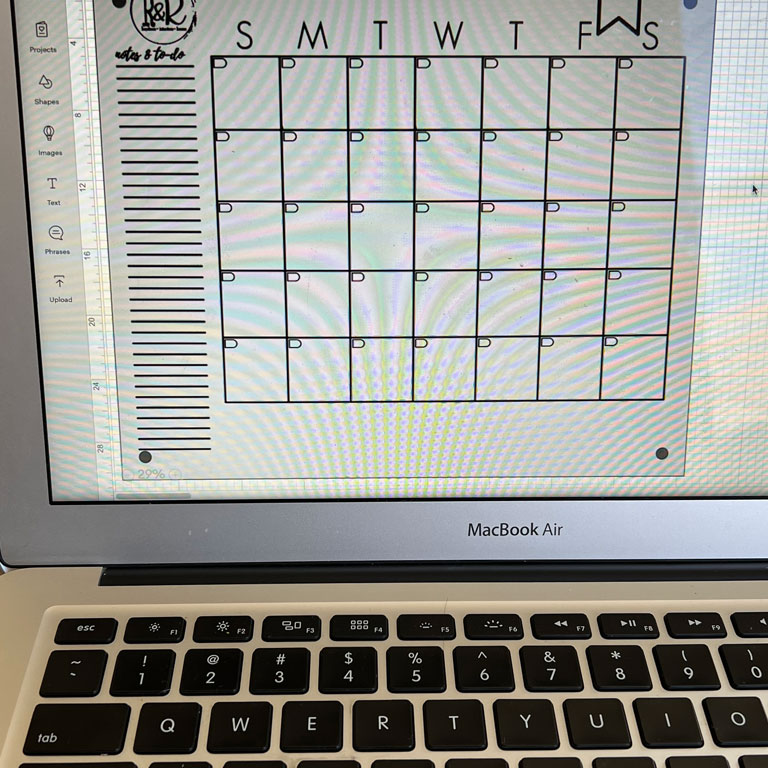
I used a combination of photoshop and Canva to create the graphic in a way that I could puzzle piece it together since the whole graphic would be too large for a 12″ x 24″ cutting mat. This was by far the most complicated & time consuming part of the whole project. (The graphic creation process would need a whole separate tutorial so I will just leave it at ‘complicated’. If you have questions, feel free to email me or leave a comment & I will try to help however I can.) After I finished my calendar design, I loaded my mat and set my Cricut to cutting.
*NOTE: I wanted my design on the wall side of the plexiglass, so I mirrored my cuts.*

⫸⫸⫸ My calendar file is available for purchase here! ⫷⫷⫷
Cut Calendar Graphic
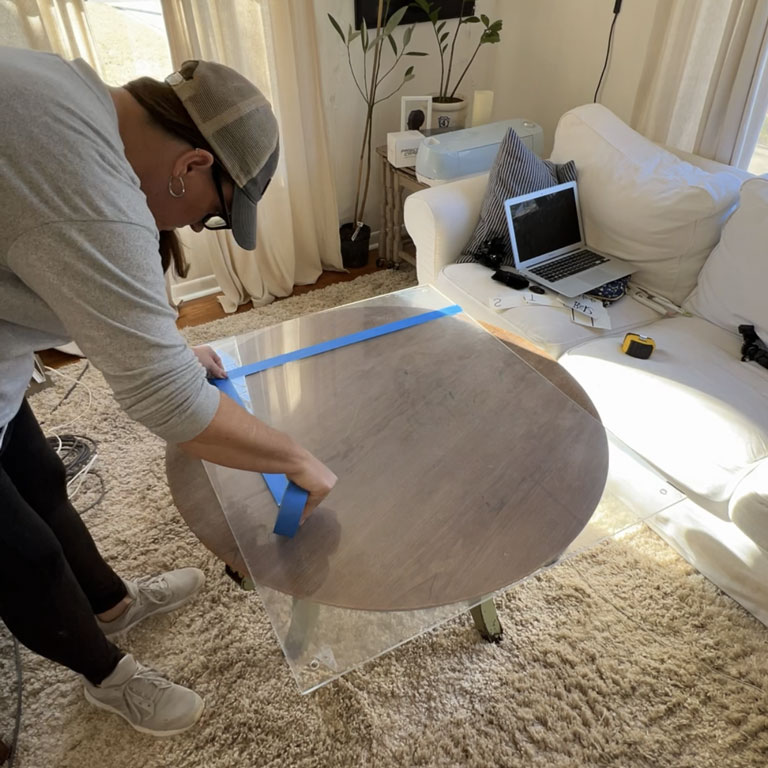
After the Cricut “kiss-cut” the vinyl, I weeded out the negative space that was not part of the graphic. Kiss-cut means that the blade only cut deep enough to go through the vinyl material but not the backing. Weeding wasn’t too tedious because the negative space was mostly large squares and thick lines. Next, I removed the protective plastic from the side of the plexiglass that the vinyl went on. Then, I used some painter’s tape to make guide lines to help line up my vinyl graphic.

Vinyl Application
Once my layout was marked, I used transfer tape and my scraper/rubbing tool to remove the vinyl from its backing. Then I carefully placed each vinyl piece on the plexiglass while making sure to line it up. I rubbed the vinyl with steady pressure to make sure it was stuck tight and slowly removed the transfer tape. Voilà, the makings of my very own plexiglass calendar! It is such a great feeling when a plan or idea comes together like I hoped.


Calendar Installation
Finally, the final two steps after applying vinyl were to remove the protective plastic and install the acrylic wall calendar. TA-DA!! A versatile acrylic calendar that I can write on and also has large enough squares to fit a post-it note. The time and effort spent on this calendar was 100 percent worth it, without a doubt!

Acrylic Wall Calendar Update
After several months, I gave my acrylic wall calendar an upgrade with Rustoleum Frosted Glass spray paint. I sprayed the backside of the plexiglass, let dry and reattached. This helped make the writing on the acrylic much easier to read especially against the gray wall. I added a led picture light above it as well. I use this calendar often during the night time hours, so turning on the hall light isn’t always a good option because it shines directly into my kids’ bedroom. The picture light was the perfect solution!
